Android - COMO CREAR TABLA DE POSICIONES EN ANDROID

 
Vista:
sin imagen de perfil

COMO CREAR TABLA DE POSICIONES EN ANDROID

Publicado por Isaias (3 intervenciones) el 10/06/2016 18:31:56
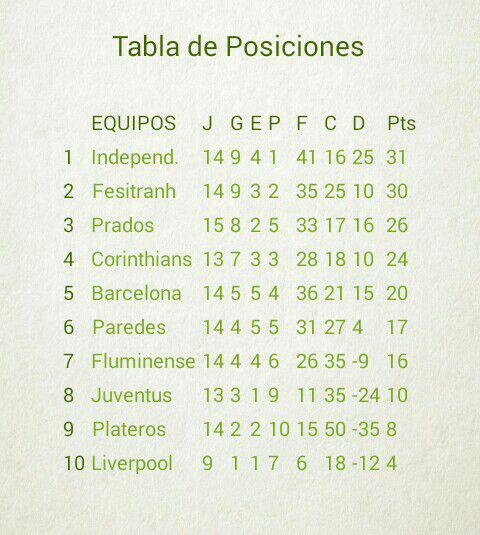
Hola amigos necesito ayuda para elaborar una tabla de posiciones de una liga de fútbol ,donde hay 10 equipos y la tabla se va llenando cada vez que se vallan dando los resultados de los partidos, pero tengo pocos conocimientos para poder elaborarla ya que vengo comenzando a programar en android studio.


Este es un ejemplo de liga de equipos aficionados.

Tabla-Posiciones
Valora esta pregunta
Me gusta: Está pregunta es útil y esta claraNo me gusta: Está pregunta no esta clara o no es útil
0
Responder
sin imagen de perfil

COMO CREAR TABLA DE POSICIONES EN ANDROID

Publicado por Esmeralda (11 intervenciones) el 11/06/2016 08:30:39
Hola este ejemplo se parece al resltado de tu imagen:

1
2
3
4
5
6
7
8
<!--Array con los valores de la cabecera de la tabla-->
<string-array name="cabecera_tabla">
    <item>Id de la fila</item>
    <item>Valor</item>
    <item>Valor 2</item>
    <item>Valor 3</item>
    <item>Valor 4</item>
</string-array>
Ahora nos creamos una clase a la que llamaremos Tabla:


1
public class Tabla {}
Le agregamos las siguientes variables de clase:

1
2
3
4
5
private TableLayout tabla; // Layout donde se pintará la tabla
private ArrayList<TableRow> filas; // Array de las filas de la tabla
private Activity actividad;
private Resources rs;
private int FILAS, COLUMNAS; // Filas y columnas de nuestra tabla
Como es obligado nos creamos nuestro constructor de la clase:


1
2
3
4
5
6
7
8
9
10
11
12
13
/**
* Constructor de la tabla
* @param actividad Actividad donde va a estar la tabla
* @param tabla TableLayout donde se pintará la tabla
*/
public Tabla(Activity actividad, TableLayout tabla)
{
    this.actividad = actividad;
    this.tabla = tabla;
    rs = this.actividad.getResources();
    FILAS = COLUMNAS = 0;
    filas = new ArrayList<TableRow>();
}
Ahora procederemos a crear dos métodos indispensables, una para agregar la cabecera a nuestra tabla dinámica y otro para agregar una fila.

1
2
3
4
5
6
7
8
9
10
11
12
13
14
15
16
17
18
19
20
21
22
23
24
25
26
27
28
29
30
31
32
33
34
35
36
37
38
39
40
41
42
43
44
45
46
47
48
49
50
51
52
53
54
55
56
57
58
59
60
61
62
/**
* Añade la cabecera a la tabla
* @param recursocabecera Recurso (array) donde se encuentra la cabecera de la tabla
*/
public void agregarCabecera(int recursocabecera)
{
    TableRow.LayoutParams layoutCelda;
    TableRow fila = new TableRow(actividad);
    TableRow.LayoutParams layoutFila = new TableRow.LayoutParams(TableRow.LayoutParams.WRAP_CONTENT, TableRow.LayoutParams.WRAP_CONTENT);
    fila.setLayoutParams(layoutFila);
 
    String[] arraycabecera = rs.getStringArray(recursocabecera);
    COLUMNAS = arraycabecera.length;
 
    for(int i = 0; i < arraycabecera.length; i++)
    {
        TextView texto = new TextView(actividad);
        layoutCelda = new TableRow.LayoutParams(obtenerAnchoPixelesTexto(arraycabecera[i]), TableRow.LayoutParams.WRAP_CONTENT);
        texto.setText(arraycabecera[i]);
        texto.setGravity(Gravity.CENTER_HORIZONTAL);
        texto.setTextAppearance(actividad, R.style.estilo_celda);
        texto.setBackgroundResource(R.drawable.tabla_celda_cabecera);
        texto.setLayoutParams(layoutCelda);
 
        fila.addView(texto);
    }
 
    tabla.addView(fila);
    filas.add(fila);
 
    FILAS++;
}
 
/**
* Agrega una fila a la tabla
* @param elementos Elementos de la fila
*/
public void agregarFilaTabla(ArrayList<String> elementos)
{
    TableRow.LayoutParams layoutCelda;
    TableRow.LayoutParams layoutFila = new TableRow.LayoutParams(TableRow.LayoutParams.WRAP_CONTENT, TableRow.LayoutParams.WRAP_CONTENT);
    TableRow fila = new TableRow(actividad);
    fila.setLayoutParams(layoutFila);
 
    for(int i = 0; i< elementos.size(); i++)
    {
        TextView texto = new TextView(actividad);
        texto.setText(String.valueOf(elementos.get(i)));
        texto.setGravity(Gravity.CENTER_HORIZONTAL);
        texto.setTextAppearance(actividad, R.style.estilo_celda);
        texto.setBackgroundResource(R.drawable.tabla_celda);
        layoutCelda = new TableRow.LayoutParams(obtenerAnchoPixelesTexto(texto.getText().toString()), TableRow.LayoutParams.WRAP_CONTENT);
        texto.setLayoutParams(layoutCelda);
 
        fila.addView(texto);
    }
 
    tabla.addView(fila);
    filas.add(fila);
 
    FILAS++;
}
Como podéis ver la función obtenerAnchoPixelesTexto hay que definirla, esta función nos devuelve el ancho en píxeles de un texto almacenado en un String, la utilizamos para poder calcular el ancho de las filas de nuestra tabla.


1
2
3
4
5
6
7
8
9
10
11
12
13
14
/**
* Obtiene el ancho en píxeles de un texto en un String
* @param texto Texto
* @return Ancho en píxeles del texto
*/
private int obtenerAnchoPixelesTexto(String texto)
{
    Paint p = new Paint();
    Rect bounds = new Rect();
    p.setTextSize(50);
 
    p.getTextBounds(texto, 0, texto.length(), bounds);
    return bounds.width();
}
Una vez hecho todo esto ya tenemos lo básico para poder utilizar una tabla dinámica.

Ahora ¿cómo podemos hacer uso de ella?, bien en nuestro xml de la actividad donde colocaremos nuestra tabla deberemos de declarar lo siguiente:

Un Layout para contener los elementos
Un Scroll vertical, para poder movernos hacia arriba y abajo
Un Scroll horizontal, para poder movernos hacia la derecha e izquierda
Un TableLayout, donde estará nuestra tabla
Quedaría de la siguiente forma:

1
2
3
4
5
6
7
8
9
10
11
12
13
14
15
16
17
18
19
20
21
22
23
24
25
26
27
28
29
30
31
32
33
34
35
36
<LinearLayout
    android:orientation="vertical"
    android:layout_width="match_parent"
    android:layout_height="match_parent"
    android:layout_weight="1"
    android:id="@+id/layoutTabla"
    android:gravity="center">
 
    <ScrollView
        android:id="@+id/scrollvertical"
        android:layout_width="wrap_content"
        android:layout_height="wrap_content"
        android:scrollbars="vertical"
        android:layout_weight="1">
 
        <HorizontalScrollView
            android:layout_width="wrap_content"
            android:layout_height="wrap_content"
            android:id="@+id/scrollhorizontal"
            android:scrollbars="horizontal"
            android:layout_weight="1">
            <LinearLayout
                android:orientation="vertical"
                android:layout_width="wrap_content"
                android:layout_height="wrap_content">
                <TableLayout
                    android:id="@+id/tabla"
                    android:layout_width="wrap_content"
                    android:layout_height="wrap_content">
                </TableLayout>
            </LinearLayout>
        </HorizontalScrollView>
 
    </ScrollView>
 
</LinearLayout>
Y de código Java necesitamos lo siguiente:


1
2
3
4
5
6
7
8
9
10
11
12
Tabla tabla = new Tabla(this, (TableLayout)findViewById(R.id.tabla));
tabla.agregarCabecera(R.array.cabecera_tabla);
for(int i = 0; i < 15; i++)
{
    ArrayList<String> elementos = new ArrayList<String>();
    elementos.add(Integer.toString(i));
    elementos.add("Casilla [" + i + ", 0]");
    elementos.add("Casilla [" + i + ", 1]");
    elementos.add("Casilla [" + i + ", 2]");
    elementos.add("Casilla [" + i + ", 3]");
    tabla.agregarFilaTabla(elementos);
}
Valora esta respuesta
Me gusta: Está respuesta es útil y esta claraNo me gusta: Está respuesta no esta clara o no es útil
0
Comentar
sin imagen de perfil

COMO CREAR TABLA DE POSICIONES EN ANDROID

Publicado por Isaias (3 intervenciones) el 14/06/2016 05:57:53
Muchas gracias amigo probare el codigo que me diste
Valora esta respuesta
Me gusta: Está respuesta es útil y esta claraNo me gusta: Está respuesta no esta clara o no es útil
0
Comentar
sin imagen de perfil

COMO CREAR TABLA DE POSICIONES EN ANDROID

Publicado por Isaias (3 intervenciones) el 14/06/2016 05:56:46
Muchas gracias amigo probare el codigo que me diste.
Valora esta respuesta
Me gusta: Está respuesta es útil y esta claraNo me gusta: Está respuesta no esta clara o no es útil
0
Comentar